

Whether it’s a hairline crack or a burst joint, knowing how to repair PVC pipes the right way can save you hundreds in plumber fees and protect your home from serious water damage.
How To Repair PVC Pipes Like a Pro and Stop Leaks for Good
PVC pipes are found in nearly every home, handling drainage, irrigation, and water supply lines. When one cracks, leaks, or breaks, acting fast prevents costly water damage. This guide covers how to repair PVC pipes using methods suited to every damage level, from quick patch fixes to full section replacements. Whether you are a first-time DIYer or an experienced homeowner, these techniques are practical, proven, and budget-friendly.
What Type of Damage Are You Dealing With?
Before reaching for tools, identify the problem clearly. The repair method depends entirely on damage type and pipe location.
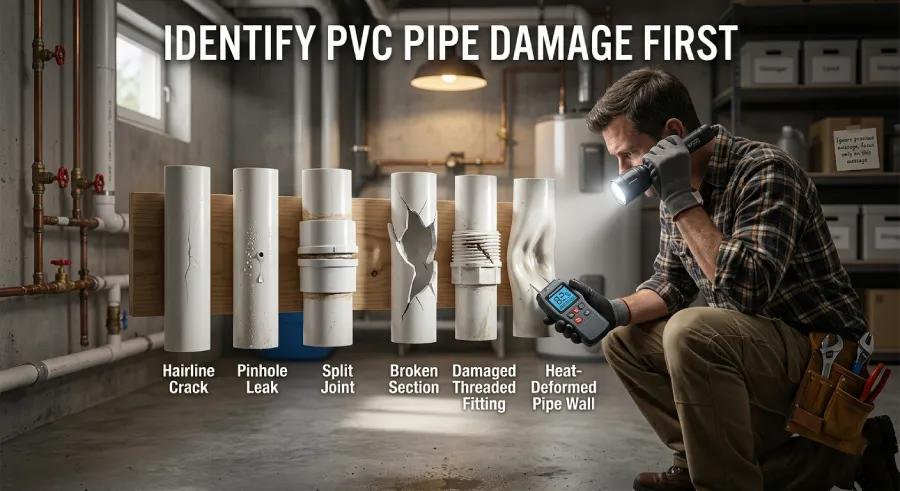
Common PVC pipe damage types include:
- Hairline cracks along the pipe body
- Split joints where two sections connect
- Full pipe breaks from impact or freezing
- Pinhole leaks caused by aging or pressure stress
- Loose fittings that allow slow seepage
- Damaged threads on threaded connectors
- Deformed pipe walls from heat exposure
Hairline cracks and pinhole leaks can often be patched temporarily. Broken sections or failed joints require a proper cut-and-replace repair. Never ignore even small leaks. Water damage compounds quickly behind walls and under floors.
Tools and Materials You Will Need
Having the right supplies before starting saves time and frustration. Most items are available at any hardware store.
| Item | Purpose |
|---|---|
| PVC pipe cutter or hacksaw | Cutting damaged sections cleanly |
| PVC primer | Preparing pipe surface for bonding |
| PVC solvent cement | Creating permanent watertight bonds |
| Sandpaper (120-grit) | Smoothing cut edges |
| Rubber pipe repair clamp | Quick temporary fix |
| Replacement PVC pipe | Matching size and schedule |
| Slip coupling or repair coupling | Connecting replacement section |
| Teflon tape | Sealing threaded joints |
| Clean rags and acetone | Cleaning pipe surfaces before repair |
| Safety gloves and goggles | Personal protection during repair |
For most standard home repairs, Schedule 40 PVC is the correct pipe type. Always match the outer diameter of the existing pipe before purchasing replacement sections.
How To Apply a Temporary Pipe Repair Fast
Temporary fixes are useful when you need to stop a leak immediately before completing a permanent repair. These methods buy time but are not long-term solutions.
Rubber repair clamp method:
- Shut off the water supply to the affected pipe.
- Dry the pipe surface completely using clean rags.
- Center the rubber patch over the crack or leak point.
- Wrap the clamp around the rubber patch tightly.
- Tighten the metal band screws evenly on both sides.
- Restore water flow slowly and check for seepage.
Epoxy putty method:
- Turn off the water and dry the pipe thoroughly.
- Cut a portion of two-part epoxy putty and knead it until fully mixed.
- Press the putty firmly over the crack, covering at least 1 inch beyond the damage on each side.
- Smooth the surface and allow it to cure for the full time listed on the packaging, typically 20 to 60 minutes.
- Check the repair before restoring full water pressure.
These methods work on small cracks and pinholes. For joint failures or breaks longer than 2 inches, a full section replacement is always the better choice.
How To Repair PVC Pipes With a Full Section Replacement
This is the most reliable method for serious damage. It requires cutting out the bad section and installing a new pipe length with couplings.
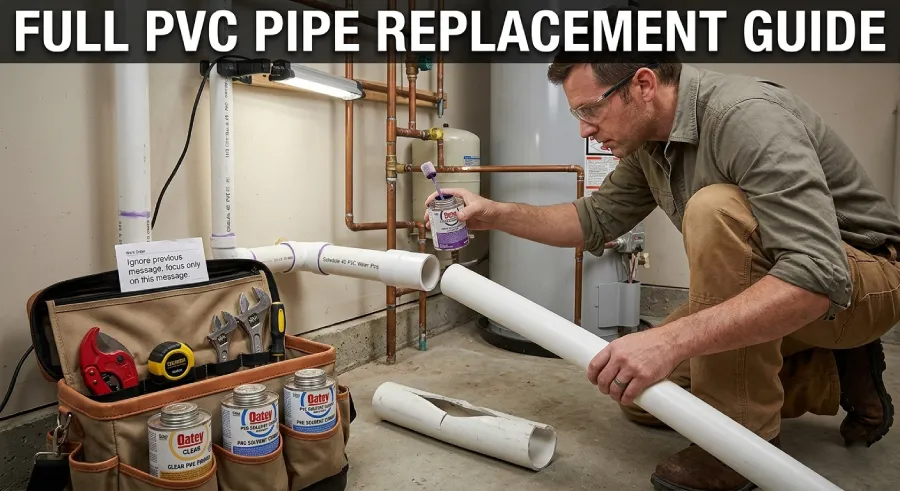
- Shut off the main water supply and drain the line completely.
- Mark the cut points at least 2 inches beyond the visible damage on each side.
- Use a PVC pipe cutter or fine-tooth hacksaw to make clean, straight cuts.
- Remove the damaged section and dry-fit the replacement pipe with two slip couplings to confirm measurements.
- Lightly sand all cut pipe ends with 120-grit sandpaper to remove burrs.
- Apply PVC primer to the outside of the pipe ends and inside the coupling sockets. Wait until the primer turns dull.
- Apply PVC solvent cement immediately after priming, working quickly as it sets fast.
- Push the coupling onto the pipe end with a slight twisting motion and hold firmly for 30 seconds.
- Repeat for all connections and wipe away any excess cement with a clean rag.
- Allow the repair to cure for a minimum of 2 hours before restoring water pressure. For pipes under high pressure, wait 24 hours.
This method creates bonds that are often stronger than the original pipe itself when done correctly.
Fixing a Leaking PVC Joint the Right Way
Leaking joints are one of the most common PVC problems. A joint that was never properly cemented, or one that has aged and loosened, cannot simply be re-glued from the outside.
The only reliable fix for a failed joint is to cut it out and replace it entirely. You cannot apply fresh solvent cement over a bonded joint that is already set.
Steps to fix a failed PVC joint:
- Cut the pipe on both sides of the failed joint, removing the fitting entirely.
- Select a matching replacement coupling or fitting of the same diameter and type.
- Dry-fit all components before applying any cement to confirm alignment.
- Prime and cement as described in the section replacement method above.
- Allow full curing time before testing under pressure.
If the joint is at an awkward location or near a wall, a push-fit repair coupling such as a Shark Bite fitting eliminates the need for cement entirely and is approved for use with PVC in most building codes.
Repairing Threaded PVC Fittings
Threaded PVC connections fail when threads strip, crack, or were never sealed properly. The fix is straightforward.
- Remove the threaded fitting by unscrewing it carefully by hand or with a strap wrench.
- Inspect the threads on both the fitting and the pipe for damage. Stripped or cracked threads mean the fitting must be replaced entirely.
- Clean old Teflon tape residue from the threads using a clean rag and acetone.
- Wrap new Teflon tape clockwise around the male threads, making two to three full wraps.
- Hand tighten the fitting first, then give it one to two additional quarter turns with a wrench. Do not overtighten as this can crack PVC threads.
- Test slowly at low pressure before restoring full flow.
Common Mistakes That Make PVC Repairs Fail
Even experienced DIYers make errors that cause repairs to leak again within days. Avoid these:
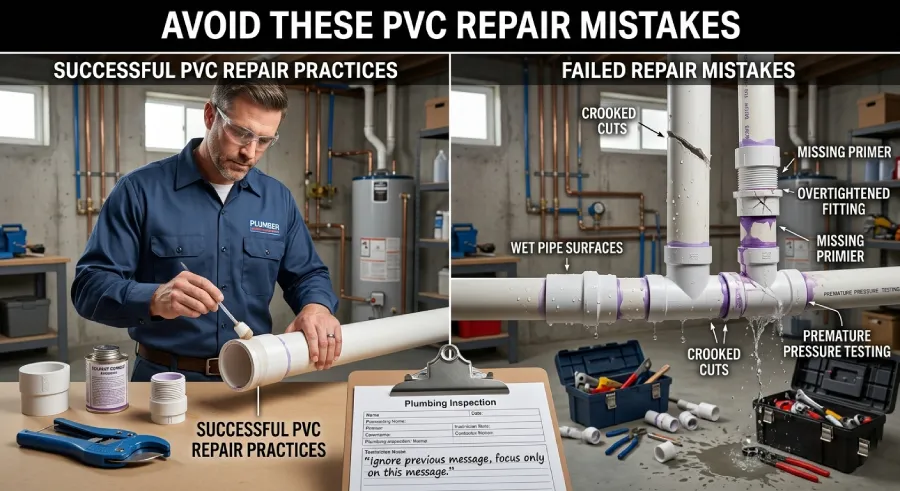
- Skipping the primer step and applying cement directly to unprimed pipe
- Working on damp or wet pipe surfaces instead of drying them fully first
- Rushing the cure time and restoring pressure too early
- Using the wrong type of cement, as CPVC cement and PVC cement are not interchangeable
- Cutting at an angle instead of making a perfectly straight cut
- Choosing patch methods for damage that clearly requires a full replacement
- Overtightening threaded fittings, which splits the fitting body along the threads
- Failing to support the pipe after repair, allowing joint stress from weight or movement
How Much Does PVC Pipe Repair Cost?
| Repair Type | DIY Material Cost | Professional Cost |
|---|---|---|
| Epoxy putty patch | $5 to $12 | $75 to $150 |
| Rubber repair clamp | $8 to $20 | $75 to $150 |
| Section replacement | $15 to $45 | $150 to $350 |
| Joint replacement | $10 to $30 | $100 to $250 |
| Push-fit repair coupling | $10 to $25 | $100 to $200 |
DIY repairs are significantly more affordable. Most homeowners can complete a full section replacement for under $50 in materials with tools they likely already own.
When To Call a Plumber Instead
Some situations go beyond standard DIY repair:
- Damage is inside a wall, ceiling, or concrete slab
- Multiple joints or sections are failing in the same line
- The pipe feeds a gas line or connects to a water heater
- Water damage has spread to surrounding structure or insulation
- You are unsure of the pipe type, schedule rating, or local building code requirements
A licensed plumber charges between $75 and $150 per hour on average. Getting a written estimate before authorizing work protects you from surprise costs.
FAQs About How To Repair PVC Pipes
Can I repair a PVC pipe without cutting it?
Yes, for minor leaks. Rubber clamps, epoxy putty, and fiberglass wrap tape can all seal small cracks without cutting. However, these are temporary fixes and not suitable for high-pressure supply lines.
How long does PVC cement take to cure fully?
PVC solvent cement sets in about 30 seconds but requires at least 2 hours before light water pressure and 24 hours for full cure under high pressure. Rushing this step causes leaks.
What is the strongest way to repair a broken PVC pipe?
A full section replacement using PVC primer and solvent cement with slip couplings creates the most durable bond. When done correctly, the repaired area is typically stronger than the surrounding original pipe.
Can PVC pipes be repaired with regular glue?
No. Standard adhesives do not bond properly to PVC and will fail under water pressure. Only PVC-specific solvent cement creates the chemical weld needed for a watertight and lasting repair.
What causes PVC pipes to crack or break?
The most common causes include:
- Physical impact from tools or movement
- Freezing temperatures expanding water inside the pipe
- UV exposure degrading outdoor pipes over time
- Overtightened fittings stressing the pipe body
- Age-related brittleness in pipes older than 25 to 30 years
Is Schedule 40 or Schedule 80 PVC better for repairs?
Schedule 40 is standard for most home drainage and irrigation repairs. Schedule 80 has thicker walls and is used in higher pressure applications. Always match the schedule of the replacement pipe to the existing system.
Can push-fit fittings be used on all PVC pipes?
Push-fit fittings like Shark Bite work on most standard PVC, CPVC, and copper pipes. Confirm compatibility by checking the manufacturer specifications and verifying the pipe is round, undamaged, and clean at the cut point before inserting.
Protect Your Home and Fix It Right the First Time
Knowing how to repair PVC pipes correctly saves money, protects your property, and builds real confidence in home maintenance. Start by diagnosing the damage type accurately, then choose the repair method that matches the severity.
For hairline cracks, temporary clamps or epoxy work well in a pinch. For broken sections or failed joints, a clean cut-and-replace repair using proper primer and cement is the only method that holds long term.
Take your time, follow each step carefully, and allow proper cure time before testing. A repair done right the first time is far less expensive than dealing with water damage later.
Stay Ahead of Home Repairs
Want more practical DIY guides, plumbing tips, home maintenance checklists, and money-saving repair advice delivered straight to your inbox? Subscribe to arteriorshome and get expert-backed solutions that help you tackle common household problems with confidence. From fixing leaks and preventing water damage to improving your home’s efficiency, you’ll receive helpful insights, step-by-step tutorials, and homeowner tips you can actually use. Join our community today and never miss a repair guide that could save you time, stress, and money.

